Cheatsheet
How to get started
- Log in at vahi.org/wp-admin
- You should now be at the dashboard
- Select Pages from the left hand menu
- You will see all pages which you can edit
- Click on the page name to edit it
- Now you are editing a page
- There are two views – HTML and Visual
Visual is good for
- Editing text generally
- Making text bold or italic
- Creating a bulleted list
- Inserting a photo or PDF
But, you must use the HTML tab for
- creating headers (<h2> tag)
- pasting text that you copied from a Word document, other web page, etc. (so that formatting doesn’t get screwed up)
- detailed editing (getting the spaces and punctation exactly right
- adding target=”_blank” inside the <a> tag after the URL of all PDFs and photo links
Checking and saving your work
- You can click Preview in the upper right to preview your changes
- When you want to update the live site click Update (blue button, upper-middle right)
- To see your work on the live site, click the View Post button above the button bar
- Remember that means your work will be live on the site, so if that is not desirable, contact Brian and Mary to help walk you through this or do the edits themselves.
- If it’s pretty simple stuff, Brian and Mary can also just “clean up” and check your edits – for your first few edits, do let us know so we can check your work
- If you click View Post multiple times, it will open multiple windows with the live site, make sure to close any old ones so you don’t get confused. Smarter: Instead of clicking View Post multiple times, you can also just Update, and then go over to the live site window you already opened, and refresh your browser.
Inserting a PDF or image file
- First make sure your file has a descriptive, relevant file name – nothing random, strange or offensive
- I recommend going to the Visual tab
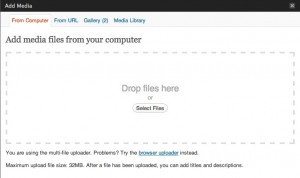
- Click Upload/Insert just above the button bar
- Make sure that the tab is on From Computer
- Select the file by clicking the button, OR, “drag” the file onto the window
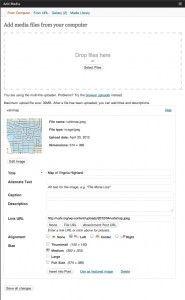
- Now some options will be presented:
- At Title, enter what you would like the hyperlink text to be
- Link URL: By default, the system will insert both the image and a hyperlink to the full sized photo – normally no reason to change this
- Alignment: select Left for text to wrap around the image, select None for the image to appear in a line by itself
- Select a Size – do you want to appear on the page:
1) a small, square thumbnail (150 by 150 pixels),
2) a medium size (most common choice) or
3) really the full sized photo? - Click Insert into Post
Resizing or deleting the photo after you inserted it
- After the photo is inserted you can resize it in Visual view by hovering over it and clicking the picture button (looks like a photograph). (Then make your changes and click Update).
- You can delete the photo (in Visual view) by hovering over it and clicking the delete button. (Red zero with slash through it)
Images (JPG, JPEG, PNG, GIF files)
Here’s what the HTML looks like when you place a small version of an image (JPG or other kind) on a page – that is, the system “shrinks” it down for your page, but when the reader clicks on the small image, the original sized image links in a larger window. That is, the small image is a hyperlink to the full-sized image.
<a href=”https://vahi.org/wp-content/uploads/2012/04/768_elkmont_garden.jpg”><img title=”768_elkmont_garden” src=”https://vahi.org/wp-content/uploads/2012/04/768_elkmont_garden-300×199.jpg” alt=”” width=”300″ height=”199″ /></a>
– the a indicates that it’s a hyperlink
– the href tells us the URL of the full sized to be opened when the reader clicks the photo
– the target=”_blank” tells the system to open the link in a new browser tab or new browser window
– the img tag indicates that an image will appear on the page
– src shows the filename of the image
– the width and height define the width and height of the (usually smaller) image that will appear on your page (because usually you are presenting a “shrunken” copy of the image which will link to a full-size copy of the image in a new tab/window)
Inserting PDFs – don’t forget the target=”_blank”
When you insert a PDF file or image (JPG, PNG, or GIF file), you can easily add it in Visual view but you’ll need to go over to HTML to add the target=”_blank”:
<a href=”https://vahi.org/wp-content/uploads/2012/04/Glamour-Paws-RESIDENT-LETTER.pdf” target=”_blank”>This makes a link that opens a PDF attachment in a new browser tab or window.</a>
– the a indicates that it’s a hyperlink
– the href tells us the URL of the linked site or file to be opened
– the target=”_blank” tells the system to open the link in a new browser tab or new browser window (what actually happens depends on the end user’s browser settings)
HTML tags
<a> and “target=_blank” – hyperlink
<a href=”http://www.cnn.com” target=”_blank”>This makes a link that takes you to cnn.com in a new browser tab or window.</a>
<a> – mailto
<a href=”mailto:communications@vahi.org” target=”_blank”>[An email address such as communications@vahi.org goes here and if the user clicks on it, it opens their mail program to send an email to this address]</a>
<b>
<b>This is used for bold text.</b>
<strong>
<strong>This is also used for bold text.</strong>
<i>
<i>This is used for italic text.</i>
<em>
<em>This is also used for italic text.</em>
<h2>
![]()
Dotted lines on homepage news items
On the homepage, each news item must have the following syntax before the news item:
<div class=”item”>
[then insert a blank line]
and each item must have the following syntax after the news item:
[first insert a blank line]
</div>
Bulleted lists
The tags for bulleted lists are:
<ul> – to begin the list
<li> – to begin a bulleted item in the list
</li> – to close the bulleted item in the list
</ul> – to close the list
example:
<ul>
<li>Item number one</li>
<li>Item number two</li>
</ul>
results in:
- Item number one
- Item number two
To get two levels of bullets, you nest a table within the table, example, this:
<ul>
<li>Item number one<ul>
<li>Item A</li>
<li>Item B</li>
</ul>
</li>
<li>Item number two</li>
</ul>
results in:
- Item number one
- Item A
- Item B
- Item number two

